Add or Edit a Revenue Collection Batch
The Revenue Collection Batch page allows authorized users to create and maintain revenue collection batches. Additionally, authorized users can create and maintain payment receipts associated with the revenue collection batch from this page.
To access the Revenue Collection Batch page, go to Financial Management > Revenue Collections > Receipts. The first time you access the Batch List page after logging in, the Select a Collection Station pop-up window displays where you must select a collection station to use when processing receipts. Click OK.
On the Revenue Collections Batch List page, click New to create a new batch or the Batch Number hyperlink in the list to open an existing batch.
Note: You cannot add/edit/void receipts and batches that have been approved if the Allow Changes to Approved Batches check box on the Revenue Defaults tab in Company Suite Settings is not selected.
The General tab allows authorized users to view general information about the batch.
- In Department, select the originating department for the revenue collection batch.
In ADD mode, if the Centralized Revenue Collection Department field on the Revenue Defaults tab on the Company Suite Settings page is defined the Centralized Revenue Collection Department is entered here by default. If one is not specified, your home department is entered. - In G/L Date, select or enter the date on which the revenue collections that are posted to the general ledger are recorded. The current system date is the default.
- Collection Station displays the collection station at which the receipts are being processed.
- In Batch Type, select the type of batch (e.g., Back Office, Counter, Deposit, or eSuite). The default type is Counter.
- In Position Cursor, select the field on the Receipt page in which you want the cursor to start by default when users enter receipts for the batch.
- The Single Cashier Batch check box is enabled only if the Batch Type is Counter and Allow Multiple Users in One Batch is selected on the Revenue Defaults tab on the Company Suite Settings page. Select this check box if a single cashier will process all receipts in the revenue collection batch or if multiple cashiers will be entering receipts. It is selected by default. If it is not selected, cashiers will need to identify themselves with each receipt transaction entered.
- Select the Print Receipts check box if a receipt should be printed upon the completion of a receipt transaction. It is selected by default if Print Receipts is selected on the Collection Station page and the Batch Type is Counter. Receipts will be generated based on the revenue collection station configuration (e.g., full page receipt or slip printer).
It is not selected by default if Print Receipts is not selected on the Collection Station page. This check box may be selected only if a printer has been defined for the collection station. If the check box is not selected, no receipts will be generated. - The Number of Copies check box is enabled when Print Receipts is selected. Select the number of copies of the receipt to print. The default entry is 1. Valid entries are 1 through 9.
- Select the Validate Checks check box if checks will be validated at the register. It is disabled unless the collection station defined for the batch has a slip printer defined as the default printer.
- The Auto Print Merchant Receipt check box, if selected, enables the printing of merchant copies along with customer receipts for credit card payments. It can be automatically enabled by default for new batches by navigating to Company Suite Settings and clicking on the Revenue Defaults tab. If selected by default it can still be cleared on the individual batch if necessary.
- The Payment Category field is enabled and required if the Batch Type is Deposit. Select the default payment category of the payment codes used when setting up batches. These values are defined in Validation Set 54. Press CTRL and click the field to open the Validation Set Values List dialog box where you can add or edit a validation set.
- The Payment Code field is enabled if the Batch Type is Counter, Back Office, or eSuite. Select the default payment code to use. It is populated with all payment codes to which you have been given authority and that are at least 100.00% distributed.
- The Payment Type field is enabled if the Batch Type is Counter, Back Office, or eSuite. Select the default payment type to use (e.g., cash, check, charge, ePayment, other).
- In Payment Date, enter or select the date on which the payment should be reflected. The current system date is the default.
- The Waive Delinquent Charges check box is enabled if the Batch Type is not Deposit. Select this check box if delinquent late fees associated with the accounts receivable sub ledger (e.g., Miscellaneous Billing or Utility Management) should be excluded when calculating the current amount owed for the customer, invoice, or billing.
- The Use Barcode Forms check box is enabled if the Batch Type is not Deposit. Select this check box if bar code scanners will be used to scan customer, invoice, or billing information.
- The Auto Process Payments check box is enabled if the Batch Type is Back Office. This check box if determines whether user intervention is required to advance from receipt to receipt (check box is NOT selected) or, if after the bar coded information is processed the transaction is automatically saved and the page is redisplayed in ADD mode ready for the next entry (check box IS selected).
- The Funds Pre-Deposited check box is enabled if the Batch Type is Deposit or Back Office. Select this check box if funds for the transaction have already been deposited; transactions with pre-deposited funds will not appear on the Bank Deposit edit reports.
- In Override Cash G/L Account select the Cash (debit) G/L account to use to override all transactions in the batch. This would be used primarily with pre-deposited funds where the bank account in which funds are deposited is associated with a different cash account than the bank account normally used to deposit funds into.
Example (click here)
- In Override Deposit Bank Account select the deposit bank account to use to override all transactions in the batch. This would be used primarily with pre-deposited funds where the bank account in which funds are deposited is different than the bank account normally used to deposit funds into.
Example (click here) - Click Save to save the record or Save/New to save the record and create another batch.
The Approvals tab allows authorized users to view and complete the approvals needed for the selected revenue collection batch. Users can also view all receipts associated with the batch.
The Summary tab allows authorized users to view summary information about the batch and associated receipts.
Use the Documents page to track documents associated with a record on your system. Documents may include Microsoft Word® text files, digitized photographs, or even video clips. The Documents page uses the Document Viewer feature.
To delete a revenue collections batch click Delete.
The Delete button is hidden or disabled if you do not have the appropriate security permissions. If you are authorized, when you click Delete you are prompted to confirm the deletion.
To reset all entries to what they were before the page was opened, click Reset.
You must be given permission by the system administrator to void or unvoid receipt batches and you must also have Supervisor authority to the Revenue Collections sub ledger in User-Based Security. To void or unvoid a batch, follow the steps below:
- Open the revenue collection batch and depending on the action you want to perform, click Void Batch or Unvoid Batch if the batch is voided in error. This launches the Void (or Unvoid) Receipt Batch pop-up window.
- Your User name and Password are required to (un)void the batch. This ensures that the batch cannot be deleted by someone who may be using your computer.
- Select a Void Reason, if used. Options are defined in Validation Set 342, Void Revenue Collection Receipt Reason.
- Click OK to void (or unvoid) the receipt batch.
Receipts
At the bottom of the Revenue Collection Batch page, a list of receipts is displayed. By default, the list displays by Receipt Number in ascending order. You can also perform the following functions related to receipts:
To add a new receipt, click New or click a a Receipt Number hyperlink to edit or view an existing receipt. If the receipt has not been printed and currently is not voided, clicking the hyperlink opens the Receipt page in EDIT mode. See Add or Edit a Receipt for more information.
If needed, click Refresh to repopulate and update the list to include any changes made by you or other authorized users.
To print a receipt form, select a receipt in the list to highlight it and click Print Receipt. The receipt form is generated and can be viewed in myReports where you can submit it to the printer.
Note: The appearance of the Void/Unvoid Receipt button is controlled by the Void/Unvoid Receipt user permissions located under Maintenance > new world ERP Suite > Security > Users.
Select the user in the list and click Permissions. Locate the permission by selecting Permission Type Company Applications and Feature Group Revenue Collections. Click the Show Search button, enter Void in the Component Name field and click Search. A red X in the All and Change columns indicates the user does not have access to the button. Click to change the icons to green checks and click Save to grant access. You will need to log out and log back in for the updated permissions to take effect.
To void or unvoid a receipt depending on the status of the receipt, follow the steps below:
- Click Void/Unvoid Receipt. This opens the Void (or Unvoid) Receipt pop-up window.
- Your User name and Password are required to (un)void the receipt. This ensures that the receipt cannot be deleted by someone who may be using your computer.
- Select a Void Reason, if used. Options are defined in Validation Set 342, Void Revenue Collection Receipt Reason.
- Click OK to void (or unvoid) the receipt.
Click Distribution to open the Receipt Transaction G/L Distribution page. The Receipt Transaction G/L Distribution page allows authorized users to view and/or enter general ledger distribution information for a specific receipt.
Click this button to reassign a receipt to a different batch.
Note: This feature cannot be used in batches associated with an active Collection Station listed on the Virtual Payment Source List page (Maintenance > new world ERP Suite > Revenue Collection > Virtual Payment Source) or batches that originate from Cashiering or Payments.
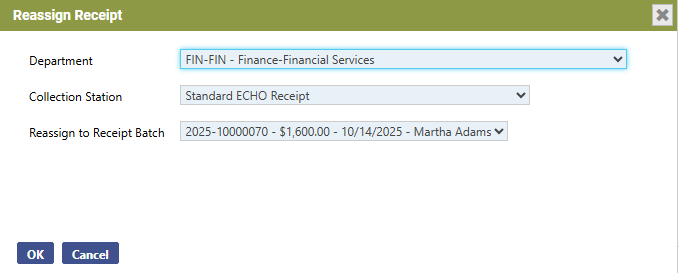
- On the Reassign Receipt popup, select the Department. The department from the current batch is the default. The dropdown contains all the departments you are authorized to in Process Manager for Revenue Collections Receipt Entry.
-
Select the Collection Station. The dropdown contains all the collection stations you are authorized to in User-Based Security.
- Select the Reassign to Receipt Batch. The dropdown contains all the open receipt batches that are on the receipt batch list. The selection displays the number of the target receipt batch, the total receipt amount, the G/L date and the cashier.
-
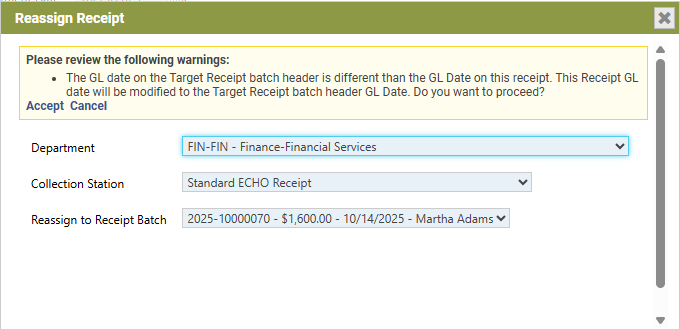
After making your selections, click OK. If the G/L date of the target receipt batch differs from the G/L date on the receipt being moved, a warning displays, saying the receipt G/L date will change to the target receipt batch G/L date:
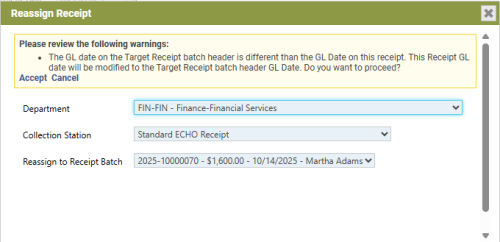
- To proceed with the reassign process, click Accept; to exit the process, click Cancel. Clicking Accept removes the receipt from the receipts grid on the General tab and adds it to the target receipt batch grid.
For the Reassign button to display on a user's Revenue Collection Batch page, the user needs permission to the Revenue Collection Reassign Receipt security component:
- Navigate to Maintenance > new world ERP Suite > Security > Users. The User List page displays.
- Use the filter in the User Name column to search for the user.
- Select the user's row.
- Click Permissions. The User Permissions page displays, containing a grid of security components and a filter panel.
- In the Applications filter, select Suite.
- In the Feature Group filter, select Revenue Collections.
-
In the Search Security Components filter, type Reassign. The grid refreshes to display the Revenue Collection Reassign Receipt component:
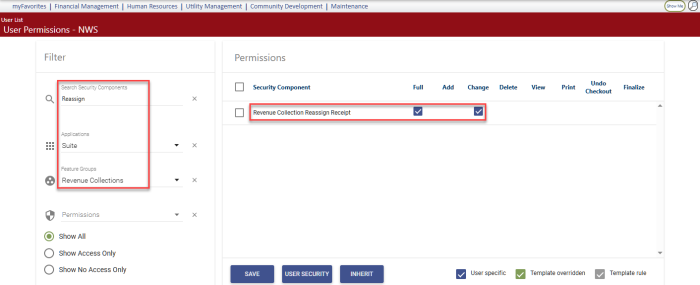
- Select Full permission.
- Click Save.
- For the permission to take effect, the user must log off and log back on.

See Also
Import Revenue Collection Receipts